|
What is InfoCenterCRM?
InfoCenterCRM can help you to . . .
·
Drive
More Sales
·
Increase Accountability
·
Improve Your Customer Experience
·
Increase Collaboration & Help You And Your Team to
·
Get
More of The Right Things Done Every Day!
InfoCenterCRM includes the
following features:
·
Customer Relationship Management
·
Account Management
·
Task
Delegation Management
·
Calendaring & Scheduling
·
Opportunity Management
·
Skype
Integration
·
File
Sharing
·
KnowledgeBase
·
Customization
On the CRM Contacts screen you can accomplish the
following activities, which relate to each contact in your
system:
·
Assign and manage tasks
·
Schedule appointments
·
Create & Track sales
opportunities
·
Contact via phone, chat or video
·
Add or review time-stamped notes
·
View the history of your
relationship
·
Attach any number of files
The Five Biggest Benefits of
InfoCenterCRM
In
today's ultra-competitive markets, the companies that manage
customer relationships the best are more likely to win than
those that don't.
1. The first benefit you will achieve
with InfoCenterCRM is
increased efficiency.
InfoCenter automates many
manual processes that
would otherwise cause significant organizational inefficiencies.
InfoCenter actually helps every member of your team to get more
of the right things every day!
2. Secondly you
will benefit from
dramatically improved collaboration
in your organization. InfoCenterCRM’s cloud-based platform
allows for employees in multiple departments to more effectively
manage your customer relationships and to see the big picture at
any time.
3. The third big
benefit is powerful data collaboration, reporting and analysis tools
that make InfoCenterCRM an indispensable part of your organization.
InfoCenterCRM helps you to understand your CRM data and learn
things about your customers that wouldn't be possible otherwise.
4. Number four,
you will notice a big improvement in
INCREASED ACCOUNTABILITY.
InfoCenter can help ensure that things don’t fall through the
cracks by adding a layer of accountability to the customer
relationship management process. InfoCenterCRM helps
employees across departments understand their responsibilities
to customers throughout the customer lifecycle and when those
responsibilities aren't met, it's easy to identify what went
wrong, where, and who fell short, and how to ensure that it
doesn't happen again.
5. And number
five, for all of the benefits InfoCenter provides, the biggest
benefit is that its use leads to
a better overall customer
experience.
System Setup
InfoCenterCRM comes ready for you
to setup your organization. We recommend that you setup
InfoCenter following this approach.
Before we begin, let’s explain the basic
navigation for InfoCenterCRM.

Notice that wherever you are in
InfoCenterCRM you will see the menu shown above.
 The
hamburger menu provides a number of options when it is clicked,
including the following: The
hamburger menu provides a number of options when it is clicked,
including the following:
|
Home
|
Displays the personal task list for
the user who is logged into the system
|
|
Administration
|
This option is only shown for users
who are designated as administrators in the system.
These management options include Organizational Profile,
Users, Task Types, and Reports.
|
|
Tasks
|
Displays the personal task list for
the user who is logged into the system
|
|
CRM
|
Displays the CRM Contact screen.
This serves as the heart of the system and is where you
will maintain all the details of your customer
relationships on contact screens, including contact
information, user-definable fields, notes, history and
attached files for each contact. Users of the system can
also schedule appointments for any contact, create tasks
that relate to any contact, Create sales opportunities,
or contact any contact through Skype integrated options,
including phone calls, Skype video calls, Text messages
or instant message chats.
|
|
Calendar
|
Displays the calendar for the
current month for the user who is logged into the
system. From this screen the user can CREATE NEW
appointments and associate these appointments with any
contact in the system. Month, week, and day views are
available. All day events are supported, as are text
alerts to make it easy to integrate with mobile devices.
Notes are also provided for each appointment. Every user
on your team has their own calendar. So you can also
manage scheduled resources, such as conference rooms by
creating a user record for each resource.
|
|
Reports
|
Displays the Reports Menu, which
currently includes TASKS I ASSIGNED reports and
COMPELTED PAID TASKS REPORT. Additional reports are also
available. Please contact us to suggest additional
helpful reports for your organization.
|
|
File
Library
|
Displays the InfoCenterCRM File
Library. This is your secure organizational cloud
storage where any member of your team can upload or
download documents of any size up to 1GB. Here, you can
also add hyperlinks to external online digital
resources, such as YouTube videos, etc. You can also
create folders to help you organize important files that
you want to make available to your team.
Your InfoCenter File Library is a
perfect place to keep all your photos, documents,
videos, spreadsheets, PDFs, or any other kind of
document that you want to make available to members of
your team. It’s secure, behind the login for each of
your users, so nobody outside your organization can
access your information. Your files are available to any
authorized user, by simply logging in to InfoCenter.
Think of it. All your stuff, always available, no matter
where you are!
|
|
KnowledgeBase
|
Displays the InfoCenterCRM
KnowledgeBase. This online KnowledgeBase or Help System
is a great place to maintain support or organizational
information.
Your InfoCenterCRM KnowledgeBase makes
it easy to support customers, team members or vendors
when they need help. If you want to make it available to
them directly, they can even help themselves. The
KnowledgeBase is completely searchable and can include
video, text and images. It’s a great place to capture
and share all the institutional knowledge that your team
has.
|
 Clicking
on the ACCOUNTS icon will display the Accounts screen. This is
where you will manage all the accounts with whom you conduct
business. Clicking
on the ACCOUNTS icon will display the Accounts screen. This is
where you will manage all the accounts with whom you conduct
business.
 Clicking
on the CRM icon will display the CRM Contacts screen. This is
where you will manage all the contacts with whom you conduct
business. Clicking
on the CRM icon will display the CRM Contacts screen. This is
where you will manage all the contacts with whom you conduct
business.
 Clicking
on the CALENDAR icon will display the CALENDAR screen. This is
where you can schedule appointments and review your personal
calendar. Each user on your team will have their own calendar. Clicking
on the CALENDAR icon will display the CALENDAR screen. This is
where you can schedule appointments and review your personal
calendar. Each user on your team will have their own calendar.
 Clicking
on the TASKS icon will display the TASKS module. This is the
heart of the task delegation management module. Here, any team
member or user can assign a task or make a request of another
team member. Tasks can be assigned to any other active member of
your organization. Other users or team members can be CCd or
BCCd on the task assignment. Task types may be assigned.
Subjects can also be included and a priority for each task can
be included, as well. Tasks can be associated with any Contact
in the CRM database. Clicking
on the TASKS icon will display the TASKS module. This is the
heart of the task delegation management module. Here, any team
member or user can assign a task or make a request of another
team member. Tasks can be assigned to any other active member of
your organization. Other users or team members can be CCd or
BCCd on the task assignment. Task types may be assigned.
Subjects can also be included and a priority for each task can
be included, as well. Tasks can be associated with any Contact
in the CRM database.
A desired COMPLETE BY date and time can
also be entered. Notes can be added by either the user giving
the assignment or the recipient of the assignment and files up
to 1GB may also be attached to each assigned task. Assigning
users may request feedback and they can request a notification
if the task is not completed on time. Assigning users can also
request that a reminder notification will be sent to the
assignee four hours prior to the completion time. Users
receiving a task assignment are instantly notified via either
email or text message, and can decline the task if they are
unable to accept it for any reason.
Please also note that in the upper right
corner of the screen a photo of the logged in user appears.
Clicking on this image will permit the user to change their
password or logout of the system.
 Clicking
on the SUGGESTIONS & FEEDBACK button will allow any member of
your team to document suggestions, bugs, feedback or
recommendations about the InfoCenterCRM system. Clicking
on the SUGGESTIONS & FEEDBACK button will allow any member of
your team to document suggestions, bugs, feedback or
recommendations about the InfoCenterCRM system.
STEP ONE: Login to InfoCenterCRM
Note that the
first user to log into your InfoCenter is the Master System
Administrator. This user has the right and responsibility to
setup the system. The following steps will make this setup
process quick and easy. In the next step you will set up the
users for your InfoCenter system. The first user is the master
administrator. That’s you. You can add as many additional users
as you like. Each user can also be an administrator, with
special system rights, or a just normal user. After you create
user records for everyone in your team they will be invited to
log in and start using the system. Everyone on your team will
need their own user account set up. This will give them access
to the system. Be sure to create a personal user record for
yourself too.
STEP TWO: Setup your personal USER record
a.
Click
the menu button
b.
Select
Administration
c.
Click
Users

d.
Your User
List screen will be displayed. Note that the only record in the
system is ADMIN.
This is your Master Administrator record. Login
as the Master Adminstrator only when you
want to act as the
system administrator.
e.
Click
[CREATE NEW]. An empty USER screen will be displayed.
f.
Create a
USER record for yourself. This will be the user identity that
you will normally use
when you access the InfoCenter
system. Fill out each of these fields according to your
personal
information.
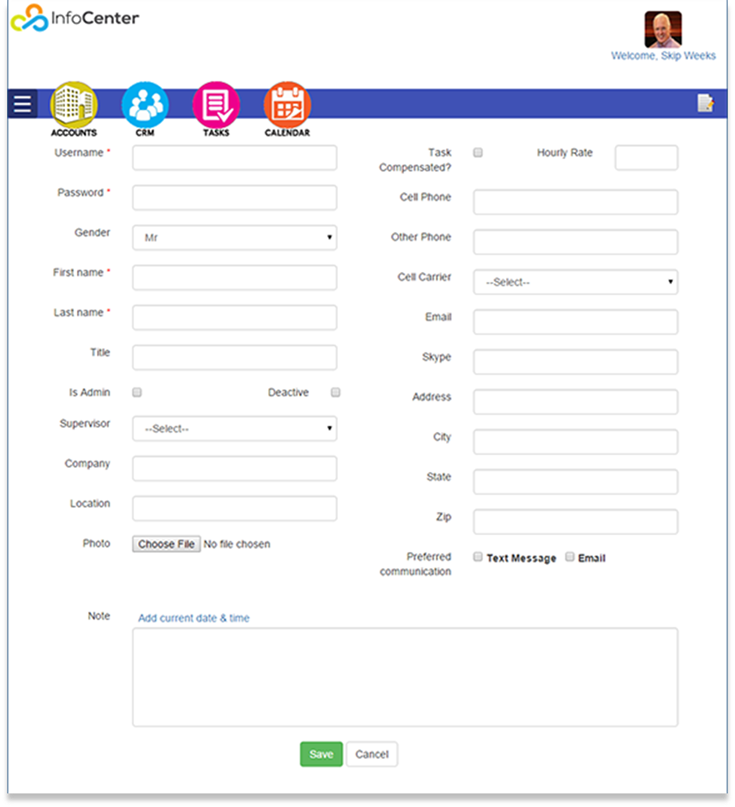
g. Be sure to click on [IS ADMIN], to
indicate that you are also a system administrator. You can
upload a photo of yourself by clicking on the [Choose File]
button. This is the image that will appear in the upper right
corner of the screen when you are logged in to the InfoCenter
system.
i.
Note
that in top of the right column you can indicate if each user is
to be compensated for assigned tasks completed. If you wish to
use this feature, click on the TASK COMPLETED option and
indicate the desired HOURLY RATE for these individuals. In the
TASK TYPES option in the Administration screen. There, you can
create standard payable task types and the associated
compensation for each type of task. These payable tasks will
appear on the COMPLETED PAID TASKS report.
ii.
The
CELL PHONE field is an important field in the system because it
allows the system to send out text messages for system
notifications. Enter your cellphone number in this field and
click on the drop-down menu for the Cellular Carrier to indicate
your cellphone carrier. This allows us to easily send text
messages to you when the system needs to notify you of alerts or
other important system messages.
iii.
Your
SKYPE ID is used to enable you to use the integrated Skype
communications features from the CRM Contact screen.
iv.
The
PREFERRED COMMUNICATION method field allows you to select your
preferred method for receiving messages from the system. Text
messages are, of course, faster than email.
v.
If you
would like to enter any notes for each user you can use the
NOTES field to do so.
vi.
You
can also ATTACH FILES to any user record, for example, and
employment agreement, etc.
vii.
Click
[SAVE] to save your record.
STEP FOUR: CREATE USER RECORDS FOR EVERY TEAM MEMBER
Click the [ADD NEW] button to create a
USER record for every member of your team. Then notify each
member of your team about their assigned USERNAME and PASSWORD,
as well as the URL for your InfoCenter system.
STEP FIVE: SETUP YOUR ACCOUNTS.
1.
Click
 to
access the ACCOUNTS LIST screen. to
access the ACCOUNTS LIST screen.
2.
Click [ADD
NEW] to add a new record for each of the organizations with whom
your organization does business.
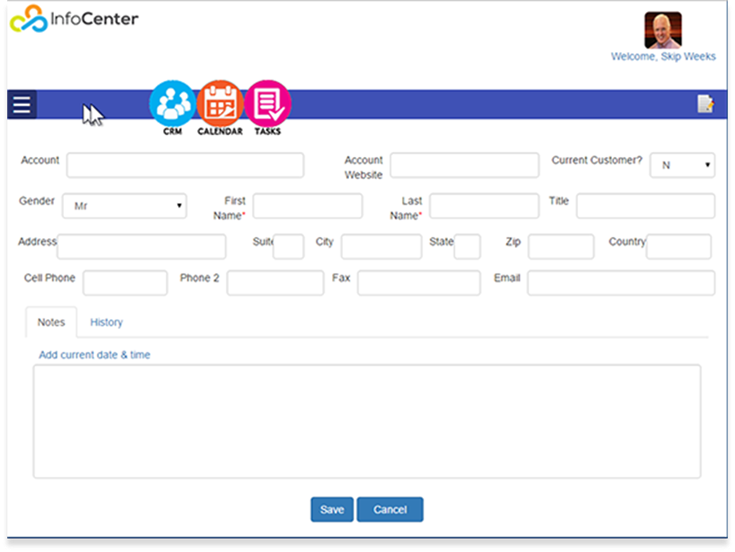
3.
Enter the
organization’s name in the ACCOUNT field. Fill out the other
fields as needed. You may also add notes for each Account
screen
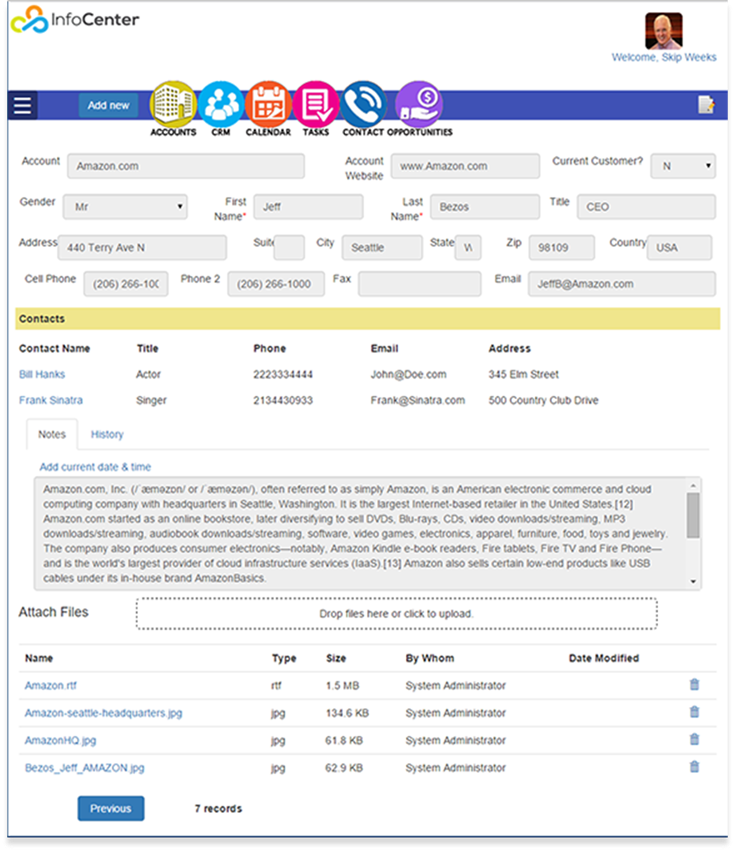
4.
CRM Contact
records can be associated with Accounts. This is done on the
individual contact screens for each individual who is associated
with each Account. As people are associated with accounts, their
names, titles, phone numbres, email and addresses will be shown
on the appropriate Account screen above the Notes, as shown
below.
STEP SIX: Setup your ORGANIZATIONAL PROFILE
a.
Click
the menu button

b.
Click
on ADMINISTRATION
c.
Click
on the PROFILE icon

d.
An
empty Profile screen will be displayed. This is a single record
for your InfoCenterCRM system that describes your organization.
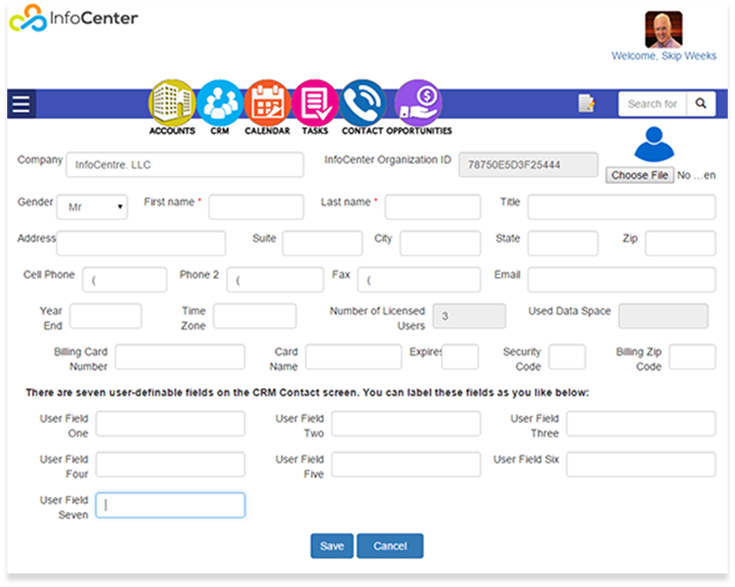
Simply fill
in each of the fields with information about your organization.
Note that only Administrators will have access to this
information. So, we recommend that you choose administrators
accordingly.
Note that
there are seven user-definable fields available, which you can
name whatever you like. Add these field names in the lower
portion of this screen and click [SAVE] when you are done. These
user –definable field names will appear on the CRM Contact
screens for your organization for each of your contact records,
so consider what kinds of information you want to store for your
contacts and name these fields appropriately.
STEP SEVEN: Enter your CRM Contact records
a.
Click
on the CRM CONTACTS icon

b.
A
sample Contact screen will be displayed. A few sample contact
records are pre-loaded in InfoCenter to show you what you can do
with the system. We recommend that you review them then delete
these sample records before entering your own contact records.
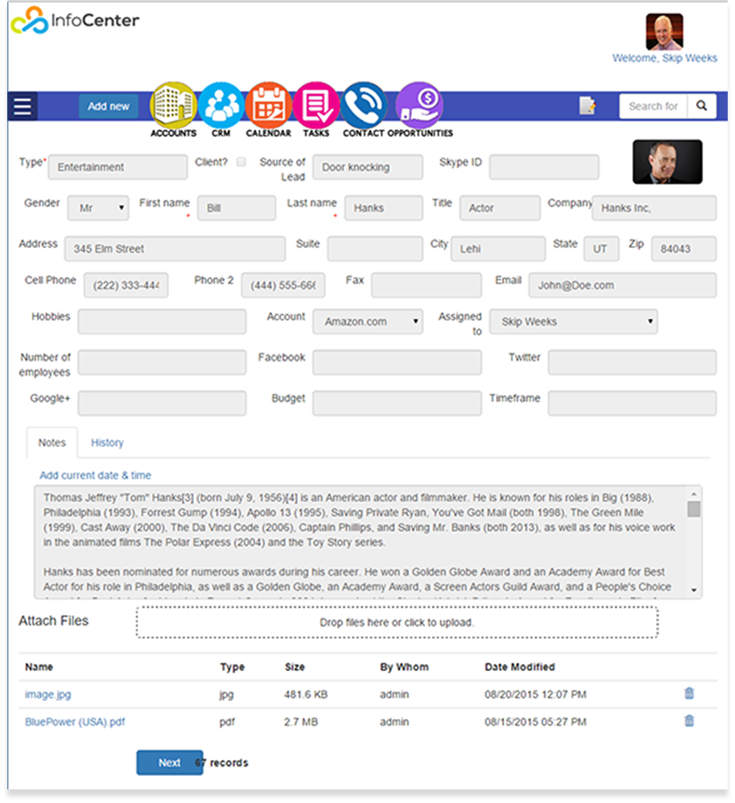
c.
The
CONTACTS screen is the heart of the InfoCenterCRM system. Here
you can add a record for every individual with whom your
organization interacts [ADD
NEW]. You can keep track of all the details of your
relationship, including their contact information, any kind of
notes, and any files that you want to attach to each contact
record. From each contact you can interact with each person by
scheduling an appointment with them in the CALENDAR, associate
them to an ACCOUNT with the drop-down ACCOUNT field, Request
assistance from any member of your team to assist with anything
that relates to any contact, or contact them using Skype to call
their mobile, or landline, conduct a Skype video conference with
them, send them a text message or have an online chat with them.
You can also create and manage SALES OPPORTUNITIES with the
Opportunities option. Note that any of these activities that are
conducted within the system will automatically create a HISTORY
entry in the history tab for each contact.
d.
The
default view in the Contacts screen is the VIEW MODE. If you
wish to EDIT a contact record you need to enter into EDIT MODE.
This is done by clicking on the CRM icon and selecting EDIT.
This will allow you to edit any of the fields on the currently
displayed contact record. Be sure to click [SAVE] to save any
changes that you make to a contact record.
e.
For
the CONTACT-> CALL option, the default field used is the CELL
PHONE field. Skype to cell or landline calls require a Skype
subscription. An unlimited subscription for the US & Canada is
available for just $2.99 per month. You can purchase or update
your Skype subscription at the following link:
https://secure.skype.com/en/calling-rates?wt.mc_id=legacy
f.
For
the SKYPE VIDEO feature to operate, you need to ensure that the
Contact has a SKYPE ID entered in the field in the upper right
corner of the contact screen. This feature is free.
g.
Text
messages are sent out by InfoCenter directly from your desktop
or tablet, using either a Chrome or Firefox browser. They are
not sent through your cellphone.
h.
Chat
is facilitated through Skype and is free.
i.
The
CRM LIST feature displays a list of your Contacts. The list
shows your Contacts Name, Cell Phone, Address, City, State and
Zip Code. The list can be sorted by clicking on the title of
each column in ascending or descending order. Note that the
names are sorted by first name, not last name order. Note also
that you can quickly display any Contacts by first name, by
clicking on the alphanumeric buttons arrayed across the top of
the list screen. Clicking on the NAME will display the
associated Contact record.
j.
Note
that you can upload photos of your contacts and these images
will appear in the upper right corner of their Contact record.
k.
Also
notice that the lower seven fields on each Contact record have
user-definable field names, which can be modified in your
organizational PROFILE screen, on the Administration screen.
l.
NOTES:
To enter a note for a Contact, click on the CRM icon and select
NOTE from the drop-down list. When you do this you will notice
that the current date and time as well as the current USER NAME
will appear at the top of the notes field, with the cursor
positioned where you can immediately begin typing your note.
Remember to [SAVE] after entering your note.
m.
ATTACHING FILES: Immediately below the NOTES section of the
Contacts screen is the ATTACH FILES area. Here, you can simply
drag a file from Finder or Windows Explorer into this dotted
area, whereupon the file will be uploaded and attached to the
currently displayed record. Any member of your team will then
have access to this attached file whenever they display this
Contact record. Alternatively, you can click on the CLICK TO
UPLOAD title of this area to open your file viewer, ie. Finder
or Windows Explorer, to select a file to be uploaded. Notice
that uploaded files appear below this area. Note that only
ADMINISTRATORS have the right to DELETE these ATTACHED FILES. If
you are an administrator you will see a small TRASH icon to the
right of ATTACHED FILES, which you can click to delete them, if
you desire.
n.
By
encouraging every member of your team to actively use
InfoCenterCRM you will quickly accumulate a comprehensive
database of all the important information that helps you serve
your customers and clients. Encourage every member of your team
to ensure that all information is always up-to-date and ask them
to keep notes on every interaction or touch they have with your
contacts. This will enable any other member of your team to
always have up-to-the-minute information needed to serve your
customers.
CUSTOMIZATION
The
InfoCenterCRM system is cloud-based, secure, and highly
customizable. If you have any questions about a possible
customization, report or integration that would be helpful to
your organization, contact us today to discuss it.
eMail
You’ve built
your business by doing things your way. Why not manage your
customer relationships your way too? With InfoCenter you can add
any kind of functionality you can dream up, with our custom
development services. Give us a call and you will be surprised
how easy and affordable it is!
PRICING
Feel free to try out InfoCenterCRM absolutely free for 30 days.
There are no restrictions and no limitations.
At the end of your free month we’ll simply charge you $10 per
month for each of your users, each month. Your organization
receives 2 GB of free storage with your subscription. Additional
storage used is billed on a monthly basis, at the rate of just
$1.00 per GB.
|